Sunday, December 7, 2014

Corset #1

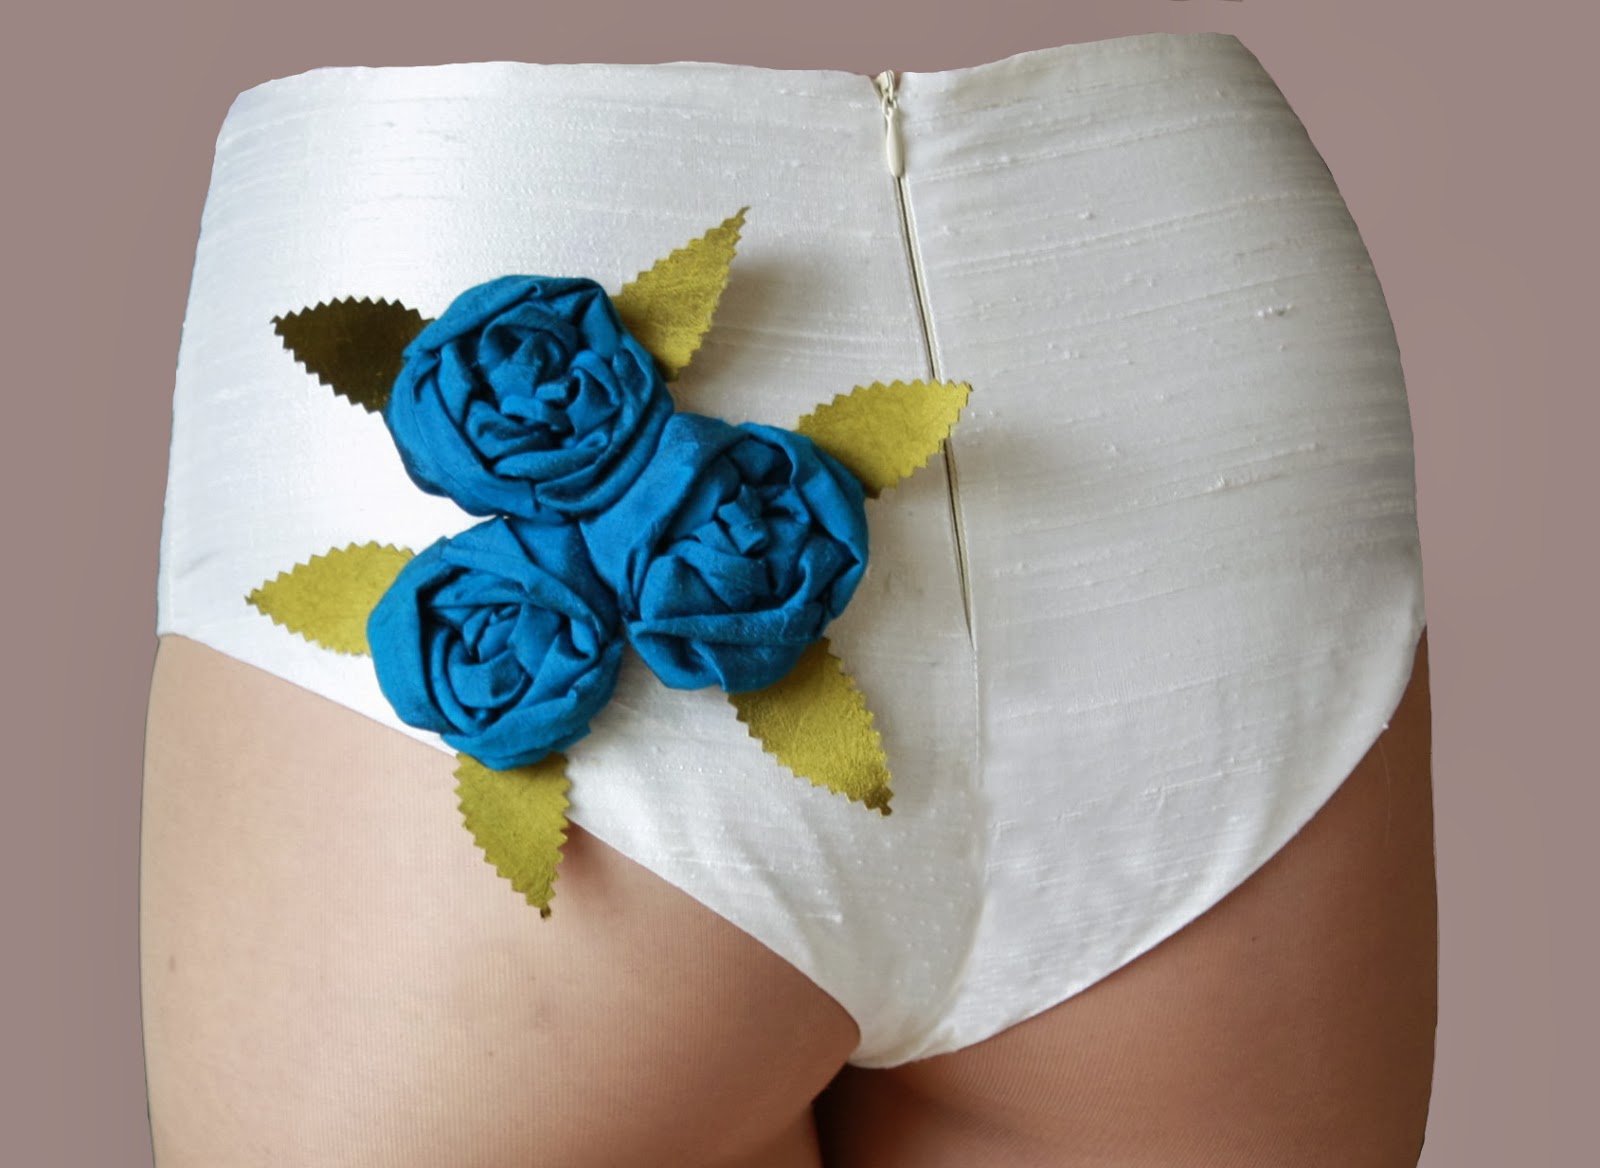
This is my first real attempt at a bona fide corset. Since this is a mock up, I decided to play with some surface design. I got some laser cut scrap-booking paper on sale (bought it just because). I never intended to use it as a stencil, but as I was brainstorming for ideas, there it was. I have fabric paints that needed used as well, so the idea naturally came together.

I thought that blocking it in here and there would be more esthetically pleasing then an all over design.


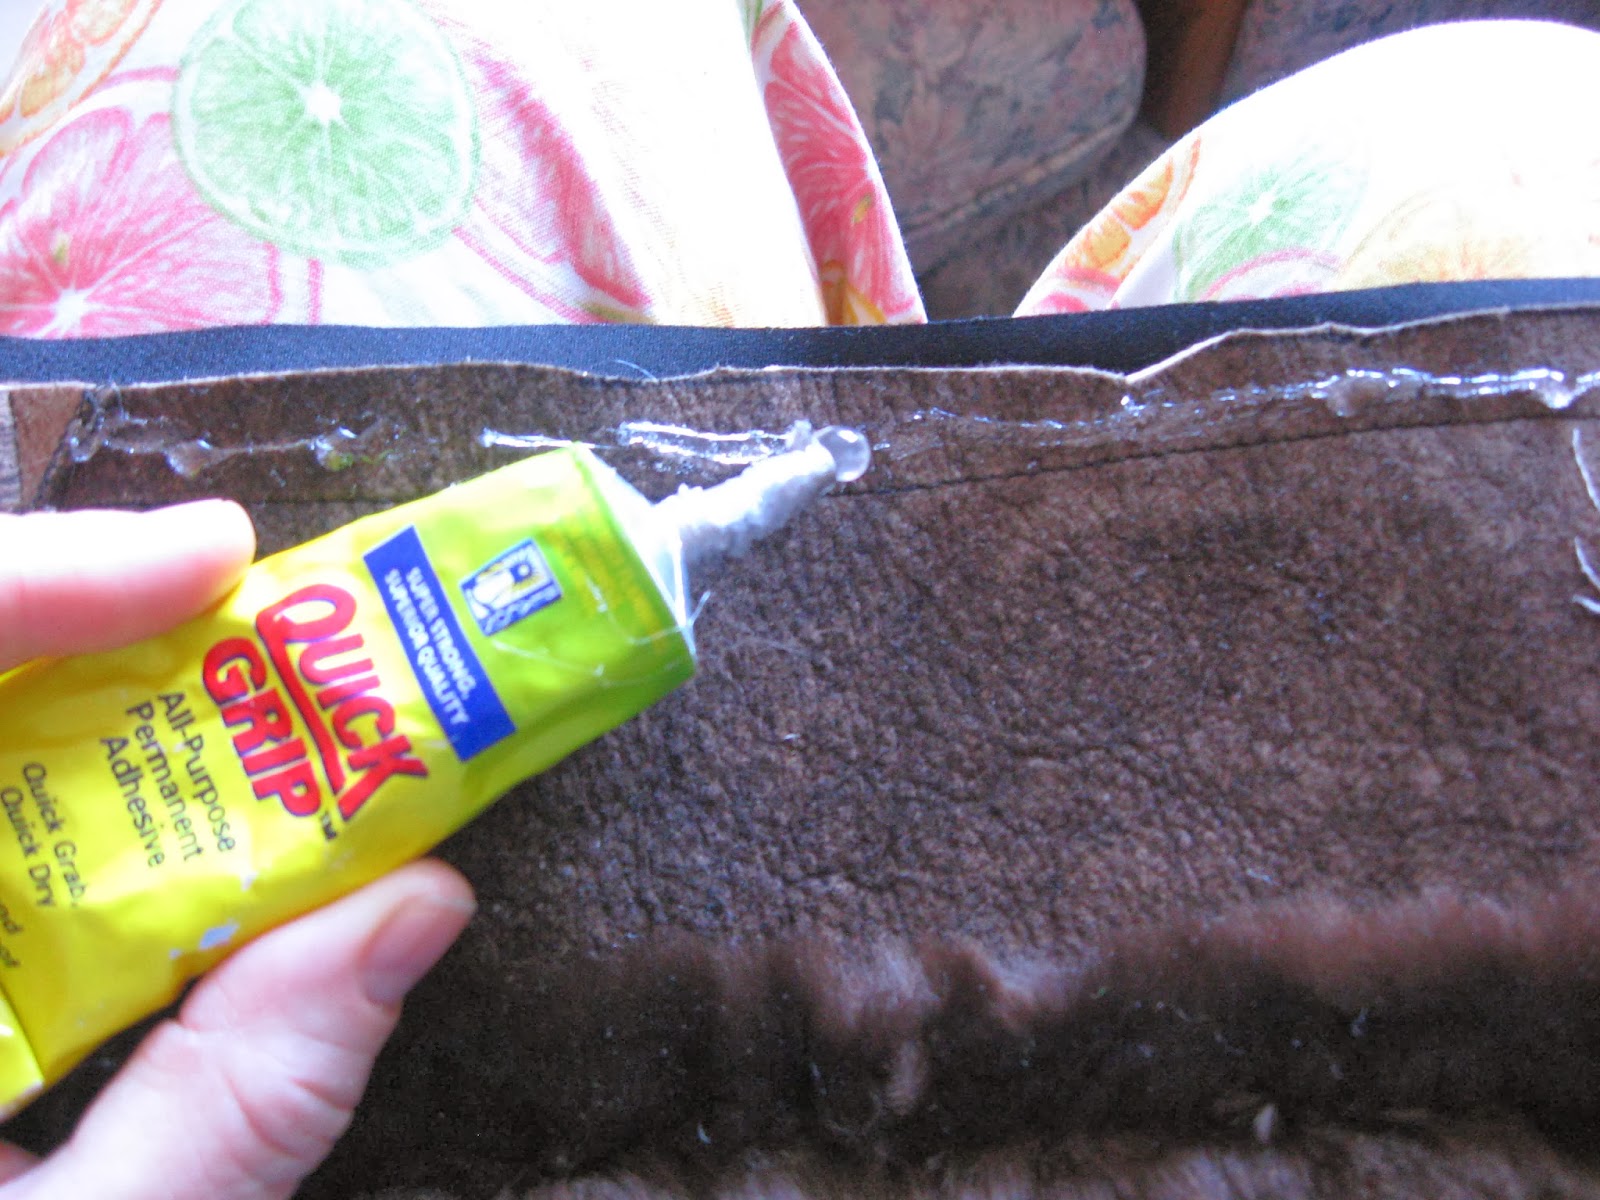
After it dried I roll pinned and stitched the finished outer fabric to the strength layer of coutil. I'm using the cheapie stuff from Richard the Thread until I get this right. I've been using old sheets as mock up material too, I used it to create the boning channels.  I decided since this is still experimental, I'd use industrial ties again. Of course the mistakes just happen. I made the channels too big, so the bones twist in the them. Lesson learned, I won't do that again.


I also cut the blue sheet out with out seam allowance, it shifted and bubbled, so haha there's another one. I sewed the waist tape in by top stitching the seam allowances down on each side.


I decided to line this because I'm not quite sure how to finish the seam allowances (and make them smooth and look nice) yet. I put the bones in and finished the CB with grommets. I placed the grommets closer together at the waist line and spread them out a little more as they approached the upper and lower edges. I tried to make the modesty panel as much of a match as possible. My grommet and boning placement didn't work out the way I wanted, so I've got that too work on as well. You can see that I put two at the top position when I should have placed them one more position down where the laces cross over.

 
 I put the laces in and attempted to put it on (comical to say the least). I need to use at least 10 yards of lacing to get it over my bum.


Once I changed the lacing and tightened it up I got to see and feel the other  problems. Your waist will either squish up or down when reduction is incorporated into the corset. Mine apparently is a down squisher and the corset didn't have enough room to accommodate the extra bulk. It pulled the seam out just under the waist tape. I sewed it up with a whip stitch and painted over it to try to remedy the problem. (a bubble gum fix). The problem starts in the pattern, so back to the drawing board on that one. I had some pressure on my ribs as well, which is also a pattern issue.


I think, with all it's faults and mistakes, it turned out cute. I love the shape and waist definition.  I'd definitely do the painting technique again. I've learned a lot from this and my next attempt should be much better.


Sunday, November 23, 2014

The Beginning

I've always loved corsets, in fact I'd watch those hokey westerns with my dad just for the corsets on the saloon girls. I've been sewing all my life and I've tried to make them multiple times. Honestly there isn't a lot of How to information out there and my attempts were mostly trial and error. I used the a vogue pattern a couple of times and that turned out ok, but the fit was never right on me. It squeezed my ribs and was painful to wear.


As you can see it's wrinkly and the boning I found was insufficient. What I ended up doing was paring rigilene and plastic boning. This made it some what supportive, but not what it should be.  And of course the fit was still the biggest issue. I'm lucky to have a figure unlike any other. sigh. One day I was googling ideas for costumes and one of the blogs I ran across had an ad for Foundations Revealed. What's that I wondered, so I clicked on it. It opened up a whole new world for me. I got a subscription and went to town. I first focused on my construction technique. Because of my sewing experience this was a no brainer. The corset below is the result of my practice. However, there are still problems. I used duct tape to drape the pattern and because my body isn't curvy, unfortunately niether is the corset. I still love this tough, look at how smooth it is.
The materials I used weren't correct. I used drop cloth as my strength fabric (it's stretchy), and the boning is industrial strength zip ties (they're bulky). I made this corset for a demonstration at a cosplay seminar. I was using cheapie supplies to save money. It turned out good enough for cosplay, but it's definitely not a REAL corset!


The next phase of my education was Pattern Drafting. I wanted to make an under bust that would fit and flatter my not so perfect figure. I used the Foundations Revealed tutorial at first, and getting the general drift of it, set out to do it my own way. I think I did rather well, but things always have to be tweaked. I joined an incredible discussion group on Face Book (Learn to make Corsets like a Pro) and got some of my fitting questions answered. My finished pattern still has some bugs in it. Because of the short distance between my ribs and hip bones, I'm running into some strange shapes at the waist line. I'm still working on this and will probably be harassing the group members for more advice.


This is what the final mock up looks like..... there where three before this one! Ugh! Yes, sometimes it takes that many and more to get it right. But I am determined, cause goodness gracious you can actually see a waistline there!


So the next step on this journey is to make it up for real and see what I come up with. I'm excited!


Wednesday, December 25, 2013

Finished Santa

The first step is to always take good measurements. My sister took his measurements for me and relayed them over the phone. I cut out the red fabric and sewed it all up, then I tried it on my brother in law for a fitting. I only had to make some minor adjustment.  Sis did a good job. I spray painted the buckles and grommets with krylon paint. I then made the  boots and the belt out of the slippery spandex. 

It was  a little difficult to get the fabric through the feed dogs, (this can happen with slippery finishes) but I put some tape over the top and it did the trick. The tape makes a rough surface for the foot to push off from.
I had  my bro in law wear the shoes he would use so I could put the elastic in the right place under his heal ( so he wouldn't step funny and slip on it). I also decided to add some elastic at the top to make sure the boot didn't fall down when the heavy fur was placed there.  

I wanted the bag to be special and repeat the gold accents from the suit. I created a stencil of cut paper and used metallic fabric paint to complete the design. 

  
I love poinsettias and so decided that is what would be on the bag. The design was repeat on both sides. It think this was the easiest part of the whole project. I then went to work on the most time consuming part. The Fur!

I don't know what this coat is made of, but it's plush and soft and still in good condition. It's outdated and the lining was ripped out so I wasn't going to use it as a fashion piece. Recycle! Recycle! Recycle!


 Because I was working with just so much room on the original coat, the new cut outs had to be pieced. I cut it out the way I mentioned in my last post and put it together the same way. The seams were beautiful and you couldn't tell where they were.


This next step was the part I had to think about. How were the ball on the ends of the hat and the bag pulls going to work? The pattern I used said to just cut out a circle and then gather the edges to make a ball. That wasn't going to be possible with the stiffness and thickness of this fur. So what I did was cut two halves of a ball and hand stitch and pull the edges up till it curled. 


As you can hopefully see, that method rounded the flat piece a bit. I then sewed two sides together and stuffed it with fiber fill. It worked perfectly. I processed all of the other fur the same way I mentioned in my previous post. 

Hello Santa!


 Poor Santa has red eyes, he was pretty tired, and he didn't seem to want his bag in the picture. He did let me take his picture so I was grateful for that. The kids loved him.

He was a great success.

Merry Christmas everyone!

Repurposed Santa

My brother in law plays Santa every year at our family party and always with a borrowed wig and hat. This summer my sis bought a santa pattern for a buck, and an old red mattress cover for $7at a yard sale with the thought that someday she'd make him a proper suit. Well me being who I am (two weeks before Christmas)  said " I've got a buckle from a purse and some black latex looking spandex (don't ask) I could make it up for our party". "Oh and I also have that fur coat you gave me". When Sis moved into their new house, the previous occupant left some pretty cool stuff and I got some of it. I'm not a big fur fan, but I believe that once the poor animal is dead what it left behind shouldn't be wasted. Also, it was free, which made the price of making this costume pretty dirt cheep, because the goal was not to spend a fortune. We bought some paint, some thread, and some needles total expense around 24 dollars. So here's what I did.
 
 
The Raw materials, Wig (left over from Halloween) , Mattress cover, Fur coat, and Black Latex. 
 
I trimmed the wig and glued the left over into a folded piece of bias tape. I used flexible fabric glue , the kind you use to put jewels or glitter on your clothes. I'm hoping that it holds up. It passed the boiling water test (scroll down) so I feel pretty confident about it.


I sliced a thin hole in the wig to accommodate the lips, then stitched all around it to stop raveling and hair loss. I had to adjust the size a little when I did a fitting, but it basically worked for the size of his mouth.
 
 
I rolled the hair up in permanent rods and boiled a pot of water. I took the water off the heat and then dropped the bundle of thermoplastic fiber into it. That's right, these cheap wigs are plastic and hot water melts it. I left it for 2 minutes and then carefully fished it out. I did the same with the strip of left overs that I made.  
 
 
When the wigs had cooled enough to touch, I started to unroll the curlers. The glue I had used got wet, of course it did, it was difficult to dip with out that happening. I was a little worried but nothing shifted or fell out.
The next step was to attach it to the hat. My idea was to make it all one piece so that nothing got separated or lost. But, I also wanted to make it washable, so it needed to break down easily.
I put snaps on the bias hair piece and sewed it to the outside of the hat, so it wouldn't take up any of the original head measurement.  
 
 
I put elastic on the inside of the hat to attach the beard to. This required a fitting so that it would be in exactly the right place so that the beard wouldn't droop slide or shift. I added snaps to the elastic and beard in two places for added strength.
 
 
Fur is a bit tricky, you have to know how to work with it, but once you do the hardest part is pushing the needle through the hide. You don't need to cut seam allowance to piece it together because it's attached with a whip stitch. When you do cut it  out, cut from the back so the pile ( the furry plush stuff) isn't damaged and it can blend together to look seamless when it's put together.

 
I did leave seam allowance on the outer edges so I could sew a binding on. I cut the pile off of this area so there would be less bulk in the seam.

 
I used a heavier needle (size 90) and my zipper foot to apply the binding. There are special leather needle you can get, but I was on a budget and they tend to be more expensive. I used a long stich  so there would be less chance of the stitching pulling out and cutting through the leather.

 
Then I put glue on  the seam allowance edges.
 
 
I turned it over and clamped it down to make a finished edge.
 
 
Next, I hand stitched the binding to the fur. Traditionally there would be some wadding between the fur and the binding, but it wasn't in the budget and I was in a hurry as well. The wadding protects and helps stabilize, but this costume will be used once a year and is not an everyday garment so I don't need to worry about it keeping it's body.
 
 
The last step was to apply the fur to the hat. I hand stitched it to the areas that the wig wouldn't be attached  and just above the snaps. It will breakdown completely when the thing needs to be cleaned.


The next post will be of the finished suit.

Wednesday, December 18, 2013

More Roses on your Cheeks

I've been at it again.
Here's three more Rosie Cheekies that will be available on Etsy very soon!
Yellow silk roses with silk velvet leaves

Purple roses and yellow green leaves made of fine Dupioni Silk


Silver Roses with bronze-ish green leaves


These are made of silk rayon velvet and lined with black Habotai silk. Since I make them to your specific measurements, they are a perfect fit and will feel comfortable against the skin. Look for them in about a week here https://www.etsy.com/shop/RaycieLaRaye

Friday, November 15, 2013

Rosie Cheeks

I spend my leisure time hand sewing my scraps of silk into roses. If I sit down to watch a movie or TV, which is rare, I'll pick up something to do. I can't stand to be idle so roses it is. Consequently, I have a whole basket full of pretty silk flowers. What to do? What to do? (insert light bulb here) Why not dress up one of my plainer designs? Thus Rosie Cheekies were born. Because I use tiny scraps of left over projects, no two cheekies will be the same. (Well not always). There will be three of these Lavender Rose Cheekies available. I had a bit more of that color, but it's still an exclusive design.


These Blue Rose Cheekies are a one of a kind creation.


As are these Red Rose Cheekies.


 I'll continue to keep my hands busy in my spare time so I'll probably offer these in other colors at another time. If you like them they can be found here... 
Along with my other creations.
 

Raycie Cheekies

I've been working hard this month. Being an independent fashion designer is no walk in the park, you really have to love what you do. I actually really love lingerie and have wanted to design it for years. After a brief stint as a Burlesque dancer and Pin up girl, I was finally inspired to get to it. So here's my first line. I call them Cheekies. They're a cute little hot pant with just a bit of cute little cheek hanging out the back. There are so many pretty parts to the female body. Although I believe in being modest most of the time, I think there is a time and place for revealing those pretty bits. My goal is to make my line of lingerie Fun and Classy, no skank involved, but as with everything else it's all about perspective. So as they do in the Burly-Q....here's the Reveal! I hope you like them, I certainly do!

 
My Sequin Cheekies


I've long had a bolt of Chinese silk Brocade with dragons and phoenix's on it. I always wondered what I would make of it. Cheekies seemed the right thing to do. I think these are my favorite!


Chinese Red Cheekies

 
I wanted to offer some softer options as well, so I created a line of frosty pastel colored Cheekies. You can go to my Etsy shop to see the range of colors. https://www.etsy.com/shop/raycielaraye
 
  
Dupioni Silk Cheekies